
Drawing process
After watching the trailer for Rogue One, I felt inspired to put some characters I've been developing into a Star Wars scene. I took progress shots as I went to hopefully show a little bit of the process.
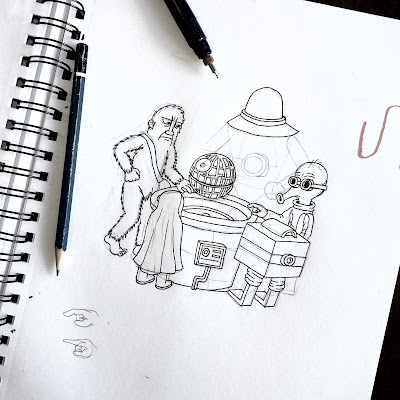
1. I often draw freehand without any penciling but I knew it would be tricky crowding these characters around the display, and I opted for some light pencilling (H). I prefer only doing light pencilling when I'm inking with my tech pen, otherwise the drawing becomes too stiff. It would have been good to have a photo of just the pencils so you get and idea of how I build on the. The robot guy in the background gives you a pretty good idea how lightly I tend to pencil. I try and not add too much detail, preferring to leave that for the inking stage.

3. Final piece after being scanned at 1200PPI, cleaned up in Photoshop using curves and threshold. I then save a pure hi res B&W version. Reduce the PPI to about 300PPI (and save as) and convert to an RGB file. I then copy the line art layer and delete the black lines. I use this copied layer to add the colour and set the top line art layer to multiply. I was originally only going to do this in the light blue colour but I felt it needed some more tones, so I added the light grey too. I can grab a web version from this file but if I was setting up a print file I would save the colour layer only as a jpeg, then place it in an Illustrator document and place the high res bitmap art over the top then save as a PDF.
 There you go. I hope you enjoyed a little behind the scenes. I should try and make another one of these but take more shots as I go through. Feel free to ask any questions.
1. I often draw freehand without any penciling but I knew it would be tricky crowding these characters around the display, and I opted for some light pencilling (H). I prefer only doing light pencilling when I'm inking with my tech pen, otherwise the drawing becomes too stiff. It would have been good to have a photo of just the pencils so you get and idea of how I build on the. The robot guy in the background gives you a pretty good idea how lightly I tend to pencil. I try and not add too much detail, preferring to leave that for the inking stage.

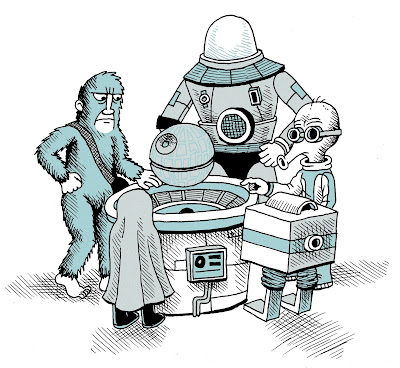
2. This is the final drawing after inking. As mentioned I inked with my Staedtler .05 tech pen, I also used a GFKP brush pen to add some thinker lines and fill in blacks. I also occasionally use this thinner fountain type pen to do the cross hatching. I'm not sure exactly what the pen is called. I picked it up from the excellent JetPens and it has 'Carbon Pen' written on the side. There's at least 3 areas where I made a mistake and just redrew the line. Also some practice for two of the hands (one's covered by the pen) and my son started drawing that squiggle on the right halfway through.

3. Final piece after being scanned at 1200PPI, cleaned up in Photoshop using curves and threshold. I then save a pure hi res B&W version. Reduce the PPI to about 300PPI (and save as) and convert to an RGB file. I then copy the line art layer and delete the black lines. I use this copied layer to add the colour and set the top line art layer to multiply. I was originally only going to do this in the light blue colour but I felt it needed some more tones, so I added the light grey too. I can grab a web version from this file but if I was setting up a print file I would save the colour layer only as a jpeg, then place it in an Illustrator document and place the high res bitmap art over the top then save as a PDF.

Comments
Post a Comment